Measurement Notes 9th Science Lesson 1 Notes in English
Measurement Notes 9th Science Lesson 1 Notes in English
Introduction
- Measurement is the basis of all important scientific study. It plays an important role in our daily life also.
- While finding your height, buying milk for your family, timing the race completed by your friend and so on, you need to make measurements.
- Measurement answers questions like, how long, how heavy and how fast?
- Measurement is about assigning a number to a characteristic of an object or event which can be compared with other objects or events.
- It is defined as the determination of the size or magnitude of a quantity.
- In this lesson you will learn about units of measurements and the characteristics of measuring instruments.
Physical Quantities and Units
Physical quantities
- Physical quantity is a quantity that can be measured.
- Physical quantities can be classified into two: fundamental quantities and derived quantities.
- Quantities which cannot be expressed in terms of any other physical quantities are called fundamental quantities.
- Example: Length, mass, time, temperature etc.
- Quantities which can be expressed in terms of fundamental quantities are called derived quantities.
- Example: Area, volume, density etc.
- Physical quantities have a numerical value and a unit of measurement (say, 3 kilogram).
- Suppose you are buying 3 kilograms of vegetable in a shop.
- Here, 3 is the numerical value and kilogram is the unit. Let us study about units now.
Units
- A unit is a standard quantity with which the unknown quantities are compared.
- It is defined as a specific magnitude of a physical quantity that has been adopted by law or convention.
- For example, feet is the unit for measuring length.
- That means, 10 feet is equal to 10 times the definite pre-determined length, called feet.
- Earlier, different unit systems were used by people from different countries.
Unit systems of earlier times
| System | Length | Mass | Time |
| CGS | centimetre | gram | second |
| FPS | foot* | pound | second |
| MKS | metre | kilogram | second |
| * foot is the singular of feet | |||
- At the end of the Second World War there was a necessity to use worldwide system of measurement.
- Hence, SI (International System of Units) system of units was developed and recommended by General Conference on Weights and Measures at Paris in 1960 for international usage.
SI System of Units
- SI system of units is the modernised and improved form of the previous system of units.
- It is accepted in almost all the countries.
- It is based on a certain set of fundamental units from which derived units are obtained by proper combination.
- There are seven fundamental units in the SI system of units. They are also known as base units
- The units used to measure the fundamental quantities are called fundamental units and the units which are used to measure the derived quantities are called derived units.
Fundamental quantities and their units
| Fundamental quantities | Unit | Symbol |
| Length | Metre | m |
| Mass | Kilogram | kg |
| Time | Second | s |
| Temperature | Kelvin | K |
| Electric current | Ampere | A |
| Luminous intensity | Candela | cd |
| Amount of substance | Mole | mol |
- With the help of these seven fundamental units, the units for other derived quantities are obtained
Fundamental Units
Length
- Length is the extent of something between two points.
- The SI unit of length is metre.
- One metre is the distance travelled by light through vacuum in 1/29,97,92,458 second.
Derived quantities and their units
| S.No | Physical quantity | Expression | Unit |
| 1 | Area | length × breadth | m2 |
| 2 | Volume | area × height | m3 |
| 3 | Density | mass / volume | kgm–3 |
| 4 | Velocity | displacement / time | ms–1 |
| 5 | Momentum | mass × velocity | kgms–1 |
| 6 | Acceleration | velocity / time | ms–2 |
| 7 | Force | mass × acceleration | kgms–2 or N |
| 8 | Pressure | force / area | Nm–2 or Pa |
| 9 | Energy (work) | force × distance | Nm or J |
| 10 | Surface tension | force / length | Nm–1 |
- In order to measure very large distance (distance of astronomical objects) we use the following units.
- Astronomical unit
- Light year
- Parsec
- Astronomical unit (AU): It is the mean distance of the centre of the Sun from the centre of the Earth. 1 AU = 1.496 × 10 11 m


![]()
- Light year: It is the distance travelled by light in one year in vacuum and it is equal to 9.46 × 10¹⁵ m.

Larger Units
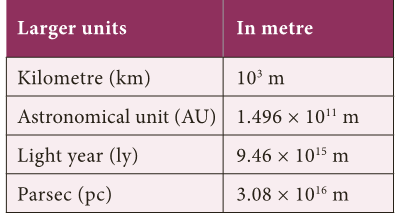
- Parsec: Parsec is the unit of distance used to measure astronomical objects outside the solar system.
- 1 Parsec = 3.26 light year.
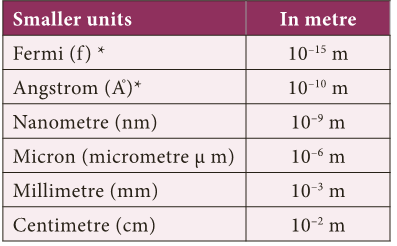
- To measure small distances such as distance between two atoms in a molecule, size of the nucleus and wavelength etc. we use submultiples of ten.
- These quantities are measured in Angstrom unit
Smaller units
| Smaller units | In metre |
| Fermi (f) * | 10–15 m |
| Angstrom (A°)* | 10–10 m |
| Nanometre (nm) | 10–9 m |
| Micron (micrometre μ m) | 10–6 m |
| Millimetre (mm) | 10–3 m |
| Centimetre (cm) | 10–2 m |
| * Unit outside SI system and still accepted for use. | |
Mass
- Mass is the quantity of matter contained in a body.
- The SI unit of mass is kilogram (kg).
- One kilogram is the mass of a particular international prototype cylinder made of platinum-iridium alloy, kept at the International Bureau of Weights and Measures at Sevres, France.
- The units gram (g) and milligram (mg) are the submultiples of ten (1/10) of the unit kg.
- Similarly quintal and metric tonne are multiples of ten (× 10) of the unit kg.
- 1 g = 1/1000 × 1 kg = 0.001 kg
- 1 mg = 1/1000000 × 1 kg = 0.000001 kg
- 1 quintal = 100 × 1 kg = 100 kg
- 1 metric tonne = 1000 × 1 kg = 10 quintal
Atomic mass unit
- Mass of a proton, neutron and electron can be determined using atomic mass unit (amu).
- 1 amu = (1/12)th of the mass of C12 atom.
![]()
More to Know
- Mass of 1 ml of water = 1g
- Mass of 1l of water = 1kg
- Mass of the other liquids vary with their density.
Time
- Time is a measure of duration of events and the intervals between them.
- The SI unit of time is second.
- One second is the time required for the light to propagate 29,97,92,458 metres through vacuum.
- It is also defined as 1/86, 400th part of a mean solar day. Larger units for measuring time are day, month, year and millennium etc.
![]()
Temperature
- Temperature is the measure of hotness or coldness of a body.
- SI unit of temperature is kelvin (K).
- One kelvin is the fraction (1/273.16) of the thermodynamic temperature of the triple point of water(The temperature at which saturated water vapour, pure water and melting ice are in equilibrium).
- Zero kelvin (0 K) is commonly known as absolute zero.
- The other units for measuring temperature are degree celsius (°C) and fahrenheit (F).
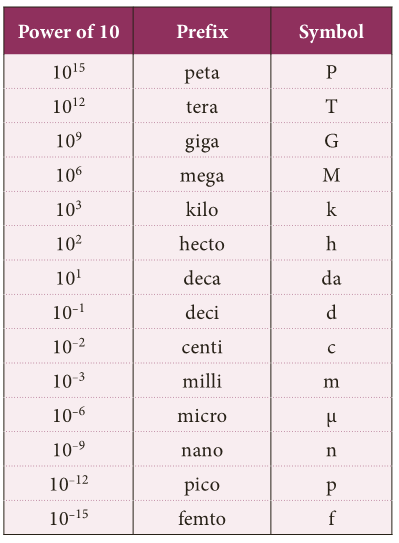
Unit Prefixes
- Unit prefixes are the symbols placed before the symbol of a unit to specify the order of magnitude of the quantity.
- They are useful to express very large and very small quantities.
- k (kilo) is the unit prefix in the unit, kilometer.
- A unit prefix stands for a specific positive or negative power of 10.
- The physical quantities vary in different proportion like from 10-15 m being the diameter of nucleus to 1026 m being the distance between two stars and 9.11 × 10⁻³¹ kg being the mass of electron to 2.2 × 1041 kg being the mass of the milky way galaxy.
Rules and Conventions for writing SI Units and their Symbols
- The units named after scientists are not written with a capital initial letter. E.g. newton, henry, ampere and watt.
- The symbols of the units named after scientists should be written by the initial capital letter. E.g. N for newton, H for henry, A for ampere and W for watt.
- Small letters are used as symbols for units not derived from a proper noun. E.g. m for metre, kg for kilogram.
- No full stop or other punctuation marks should be used within or at the end of symbols. E.g. 50 m and not as 50 m.
- The symbols of the units are not expressed in plural form. E.g. 10 kg not as 10 kgs.
- When temperature is expressed in kelvin, the degree sign is omitted. E.g. 283 K not as 283° K (If expressed in celsius scale, degree sign should be included e.g. 100°C not as 100 C, 108° F not as 108 F).
- Use of solidus (/) is recommended for indicating a division of one unit symbol by another unit symbol. Not more than one solidus is used. E.g. ms-1 or m/s. J/K/mol should be JK-1mol-1.
- The number and units should be separated by a space. E.g. 15 kgms–1 not as 15 kgms–1.
![]()
- Accepted symbols alone should be used. E.g. ampere should not be written as amp and second should not be written as sec.
- The numerical values of physical quantities should be written in scientific form. E.g. the density of mercury should be written as 1.36 × 10⁴ kgm-3 not as 13600 kgm-3.
![]()
Vernier Caliper and Screw Gauge
- In our daily life, we use metre scale for measuring lengths. They are calibrated in cm and mm.
- The smallest length which can be measured by metre scale is called least count.
- Usually the least count of a scale is 1 mm.
- We can measure the length of objects upto 1 mm accuracy with this scale.
- By using vernier caliper we can have an accuracy of 0.1 mm and with screw gauge we can have an accuracy of 0.01 mm.
Description of Vernier calliper
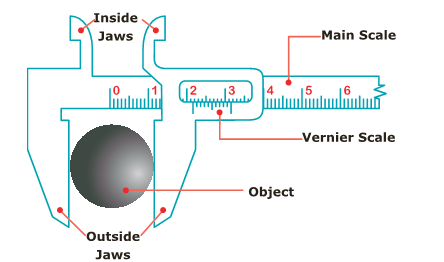
- The Vernier caliper consists of a thin long steel scale graduated in cm and mm called mainscale.
- To the left end of the main scale an upper and a lower jaw are fixed perpendicular to the bar.
- These are named as fixed jaws. To the right of the fixed jaws, a slider with an upper and a lower moveable jaw is fixed.
- The slider can be moved or fixed to any position using a screw.
- The vernier scale is marked on the slider and it moves along with the movable jaws and the slider.
- The lower jaws are used to measure the external dimensions and the upper jaws are used to measure the internal dimensions of the objects.
- The thin bar attached to the right side of the vernier scale is used to measure the depth of hollow objects.
Usage of vernier caliper
- The first step in using the vernier caliper is to find out its least count, range and zero error.
a) Least count

- The main scale division will be in centimeter, further divided into millimetre.
- The value of the smallest main scale division is 1 mm.
- In the vernier scale there will be 10 divisions.

b) Zero error
- Unscrew the slider and move it to the left, such that both the jaws touch each other.
- Check whether the zero marking of the main scale coincides with that of the zero of the vernier scale.
- If they coincide then there is no zero error. If they do not coincide with each other, the instrument is said to possess zero error.
- Zero error may be positive or negative.
- If the zero of a vernier is shifted to the right of main scale, it is called positive error.
- On the other hand, if the zero of the vernier is shifted to the left of the zero of main scale, then the error is negative.
Positive zero error
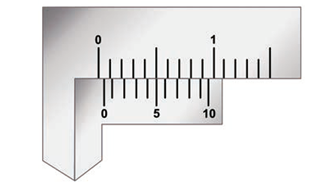
- Figure shows the positive zero error.
- From the figure you can see that zero of the vernier scale is shifted to the right of the zero of the main scale.
- In this case the reading will be more than the actual reading.
- Hence, this error should be corrected.
- In order to correct this error, find out which vernier division is coinciding with any of the main scale divisions.
- Here, fifth vernier division is coinciding with a main scale division.
- So, positive zero error = +5 × LC = +5 × 0.01 = 0.05 cm and the zero correction is negative.
- Hence, zero correction is –0.05 cm.
Problem 1
- Calculate the correct reading, if the main scale reading is 8 cm, vernier coincidence is 4 and positive zero error is 0.05 cm.
Solution:
- Correct reading = 8 cm + (4 × 0.01cm) – 0.05 cm = 8 + 0.04 – 0.05 = 8 – 0.01 = 7.99 cm
Negative zero error
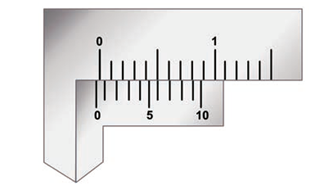
- Now look at the Figure.
- You can see that the zero of the vernier scale is shifted to the left of the zero of the main scale.
- So, the obtained reading will be less than the actual reading.
- To correct this error we should first find which vernier division is coinciding with any of the main scale divisions, as we found in the previous case.
- In this case, you can see that sixth line is coinciding. To find the negative error, we can count backward (from 10).
- Here, the fourth line is coinciding.
- Therefore, negative zero error = –4 × LC = –4 × 0.01 = –0.04 cm.
- Then zero correction is positive. Hence, zero correction is +0.04 cm.
Problem 2
- The main scale reading is 8 cm and vernier coincidence is 4 and negative zero error is 0.02 cm. Then calculate the correct reading:
Solution:
- Correct reading = 8 cm + (4 × 0.01 cm) + (0.02 cm) = 8+0.04+0.02 = 8.06 cm.
- We can use vernier caliper to find different dimensions of any familiar object.
- If the length, width and height of the object can be measured, volume can be calculated.
- For example, if we could measure the inner diameter of a beaker (using appropriate jaws) as well as its depth (using the depth probe) we can calculate its inner volume.
Digital vernier calliper

- We are living in a digital world and the digital version of the vernier callipers are available nowadays.
- Digital vernier caliper has a digital display on the slider, which calculates and displays the measured value.
- The user need not manually calculate the least count, zero error etc.
Screw Gauge
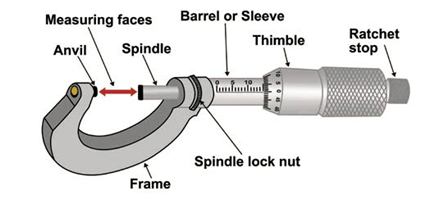
- Screw gauge is an instrument that can measure the dimensions upto 1/100th of a millimetre or 0.01 mm.
- With the screw gauge it is possible to measure the diameter of a thin wire and thickness of thin metallic plates.
Description of screw gauge
- The screw gauge consists of a U shaped metal frame. A hollow cylinder is attached to one end of the frame.
- Grooves are cut on the inner surface of the cylinder through which a screw passes.
- On the cylinder parallel to the axis of the screw there is a scale which is graduated in millimetre.
- It is called Pitch Scale (PS).
- One end of the screw is attached to a sleeve.
- The head of the sleeve (Thimble) is divided into 100 divisions and it is called the Head scale.
- The end of the screw has a plane surface (Spindle).
- A stud (Anvil) is attached to the other end of the frame, just opposite to the tip of the screw.
- The screw head is provided with a rat chat arrangement (safety device) to prevent the user from exerting undue pressure.
Using the screw gauge
- The screw gauge works on the principal that when a screw rotates in a nut, the distance moved by the tip of the screw is directly proportional to the number of rotations.
a) Pitch of the screw

- The pitch of the screw is the distance moved by the tip of the screw for one complete rotation of the head. It is equal to 1 mm in typical screw gauges.
b) Least count of a screw gauge

- The distance moved by the tip of the screw for a rotation of one division on the head scale is called the least count of the screw gauge.
c) Zero Error of a screw gauge
- When the movable stud of the screw and the opposite fixed stud on the frame area brought into contact, if the zero of the head scale coincides with the pitch scale axis there is no zero error.
Positive zero error
- When the movable stud of the screw and the opposite fixed stud on the frame are brought into contact, if the zero of the head scale lies below the pitch scale axis, the zero error is positive.
- Here, the 5th division of the head scale coincides with the pitch scale axis.
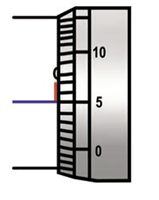
- Then the zero error is positive and is given by, Z.E = + (n × LC) where ‘n’ is the head scale coincidence.
- In this case, Zero error = + (5 × 0.01) = 0.05mm.
- So the zero correction is – 0.05 mm.
Negative zero error

- When the plane surface of the screw and the opposite plane stud on the frame are brought into contact, if the zero of the head scale lies above the pitch scale axis, the zero error is negative.
- Here, the 95th division coincides with the pitch scale axis. Then the zero error is negative and is given by,
- ZE = – (100 – n) × LC
- ZE = – (100 – 95) × LC
- = – 5 × 0.01
- = – 0.05 mm
- The zero correction is + 0.05mm.
Measuring Mass
- We commonly use the term ‘weight’ which is actually the ‘mass’.
- Many things are measured in terms of ‘mass’ in the commercial world.
- The SI unit of mass is kilogram (kg).
- In any case, the units are based on the items purchased.
- For example, we buy gold in gram or milligram, medicines in milligram, provisions in gram and kilogram and express cargo in tonnes.
- Can we use the same instrument for measuring the above listed items?
- Different measuring devices have to be used for items of smaller and larger masses.
- In this section we will study about some of the instruments used for measuring mass.
Common (beam) balance
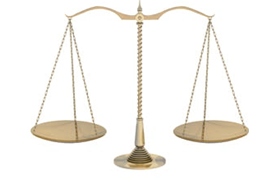
- A beam balance compares the sample mass with a standard reference mass (Standard reference masses are 5g, 10g, 20g, 50g, 100g, 200g, 500g, 1kg, 2kg, 5kg).
- This balance can measure mass accurately up to 5g .
Physical balance
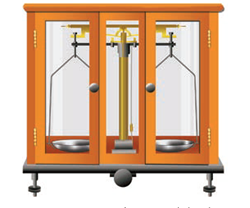
- This balance is used in labs and is similar to the beam balance but it is a lot more sensitive and can measure mass of an object correct to a milligram.
- The standard reference masses used in this physical balance are 10 mg, 20 mg, 50 mg, 100 mg, 200 mg, 500 mg, 1 g, 2g, 5 g, 10 g, 20 g, 50 g, 100g, and 200 g.
Digital balance
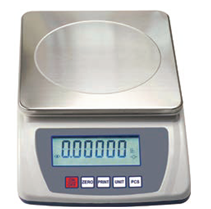
- Nowadays, for accurate measurements digital balances are used, which measure mass accurately even up to a few milligrams, the least value being 10 mg.
- This electrical device is easy to handle and commonly used in jewellery shops and labs.
Spring balance
- This balance helps us to find the weight of an object.

- It consists of a spring fixed at one end and a hook attached to a rod at the other end.
- It works by ‘Hooke’s law’ which states that the addition of weight produces a proportional increase in the length of the spring.
- A pointer is attached to the rod which slides over a graduated scale on the right.
- The spring extends according to the weight attached to the hook and the pointer reads the weight of the object on the scale.
Difference between mass and weight
- Mass (m) is the quantity of matter contained in a body. Weight (w) is the normal force (N) exerted by the surface on the body to balance against gravitational pull on the object.
- In the case of spring scale, the tension in the spring balances the gravitational pull on the object.
- When a man is standing on the surface of the earth or floor, the surface exerts a normal force on the body which is equivalent to gravitational force.
- The gravitational force acting on the object is given by ‘mg’.
- Here, m is mass of the object and ‘g’ is acceleration due to gravity.
Problem 3
- If a man has a mass 50 kg on the earth, then what is his weight?
Solution:
- Weight (w) = mg
- Mass of a man = 50 kg
- His weight = 50 × 9.8
- w = 490 newton
- The pull of gravity on the Moon is 1/6 times weaker than that on the Earth.
- This causes the weight of the object on the Moon to be less than that on the Earth by six times.
- Acceleration due to gravity on the Moon = 1.63 ms–2
- If the mass of a man is 70 kg then his weight on the Earth is 686 N and on the Moon is 114 N.
- But his mass is still 70 kg on the Moon.
Accuracy in Measurements
- When measuring physical quantities, accuracy is important.
- Accuracy represents how close a measurement comes to a true value.
- Accuracy in measurement is center in engineering, physics and all branches of science.
- It is also important in our daily life. You might have seen in jewellery shops how accurately they measure gold.
- What will happen if little more salt is added to food while cooking?
- So, it is important to be accurate when taking measurements.
- Faulty instruments and human error can lead to inaccurate values.
- In order to get accurate values of measurement, it is always important to check the correctness of the measuring instruments.
- Also, repeating the measurement and getting the average value can correct the errors and give us accurate value of the measured quantity.
| Mass | Weight |
| 1. It is a fundamental quantity. | It is a derived quantity. |
| 2. It has magnitude alone – scalar quantity. | It has magnitude and direction – vector quantity. |
| 3. It is the amount of matter contained in a body. | It is the normal force exerted by the surface on the object against gravitational pull. |
| 4. Remains the same everywhere. | Varies from place to place. |
| 5. It is measured using physical balance. | It is measured using spring balance. |
| 6. Its unit is kilogram. | Its unit is newton. |
EXTRA NOTES:
- Metre [m]: Distance light travels, in a vacuum, in 1/299792458th of a second.
- Kilogram [kg]: Mass of an international prototype in the form of a platinum-iridium cylinder kept at Sevres in France.
- Second [s]: Length of time taken for 9192631770 periods of vibration of the Caesium-133 atom to occur.
- Ampere [A]: It is that current which produces a specified force between two parallel wires which are 1 metre apart in a vacuum.
- Kelvin [K]: It is 1/273.16th of the thermodynamic temperature of the triple point of water.
- Mole [mol]: Amount of the substance that contains as many elementary units as there are atoms in 0.012 kg of carbon-12.
- Candela [cd]: Intensity of a source of light of a specified frequency, which gives a specified amount of power in a given direction.
MORE TO KNOW:
Alpha Centauri
- The nearest star alpha centauri is about 1.34 parsec from the sun.
- Most of the stars visible to the unaided eye in the night sky are within 500 parsec distance from the sun.
Mass
- The shell of an egg is 12% of its mass.
- A blue whale can weigh as much as 30 elephants and it is as long as 3 large tour buses.